Installing Proxmox VE 8.1 on my QNAP TS-x73A
Table of Contents
I installed Proxmox VE 8.1 on my QNAP TS-473A.
These are my installation notes.
ld;dr: it installs fine but the hardware is not at the quality level I expected, machine was put into electronics recycling in late 2024.
Summary
This post is my braindump of my initial bring up of PVE 8.1 single node on my QNAP TS-473A.
Whether I will cluster both my Proxmox VE instances will be decided later and, if yes, covered by a separate post.
Just another fun w-e of distro hopping on this playground box.
Because the Mellanox NIC is giving me VLAN headaches I did not us this PVE install much. It never saw any significant load in my homelab, just a couple test VMs.
Issues Reported by Others
I got this report from c.luck mid August 2024.
I have a brand new unit on my desk reporting HW V2.5 and thought I give it a try with Proxmox 8.2. Unfortunately, I get flaky onboard LAN.
Most processes which manage network interfaces or hardware in general will eventually hang, and dmesg reports hung kernel tasks, usually with some igc_* function in the stack trace.
I can reproduce the hang when wiring up just one port (enp5s0) to LAN and then calling ethtool on the other port: the command
ethtool enp6s0will never return. After that, alsoip linkwon’t return, and evenlspciwill lock up.I tested older Proxmox Kernel 6.1 and it shows the same problem.
I then tested with Debian Sid Linux 6.10 and the error changes from a infinite hang to “ethtool: No such device.”. Meanwhile,
ip linkwill show enp6s0 intermittently (sometimes it’s missing in the list, just to reappear in the next call).With QNAPs own distribution the network works flawlessly. It also works normal when I use Debian Bullseye Kernel 5.10 (with Bookworm/Proxmox 8.2 Userland).
and some USB instability reported a few weeks later
You might be interested in my further findings.
Apart of the NIC instability, I also found USB to crash when using old Kernels or any of the Proxmox Kernels.
but also a work around for the on-board 2.5G NICs
But meanwhile I have success working with the newest Bookworm Backports Kernel (6.10.4-amd64), under the condition of using the following command line options to disable power saving mechanisms:
pcie_aspm=off pcie_port_pm=off usbcore.autosuspend=-1.More generally, I’m now launching the Kernel with the following options (some of them taken over from QNAP QTS):
pci=pcie_bus_safe pcie_acs_override=downstream memmap=2M$0x8000000 ramoops.mem_address=0x8000000 ramoops.mem_size=0x200000 ramoops.console_size=0x100000 zswap.enabled=1 zswap.compressor=lz4 iommu=pt console=ttyS0,115200n8 console=tty0 pcie_aspm=off pcie_port_pm=off usbcore.autosuspend=-1 big_root_windowThis still only gives me a stable system with the newest Bookworm Backports Kernel (6.10.4-amd64), it continues to fail with any older Kernel of either Debian or Proxmox.
(You should be able to drop console=ttyS0,115200n8 if you do not have a serial console attached).
Introduction
The QNAP TS-473A being my primary distro hopping playground, I wanted to give PVE 8 a spin on this small NAS box.
The idea is to eventually have more than one PVE instance in my homelab. But this post is just about installing Proxmox VE 8.1 on the TS-473A.
Currently I run a couple VMs on my existing PVE install on Dell T7910 (which I recently upgraded to version 8). As with any cluster I used, 2 nodes is not really a good idea. In a cluster, I personally want ≥ 3 and ideally an odd number of nodes. While I could use an external tie-breaker IP and PVE docs do mention that, for once I found the Proxmox docs sub-optimal.
Hardware Used
Since my initial bring up, the storage layout has changed. It is now:
- 4x 2TB SATA SSD
- 2x 2TB NVMe
Planned Install Options
- ZFS on the 4x 2TB SATA SSDs.
rpoolandrpool/datalike I do on the T7910 - ignore the 2 NVMe during install
- use onboard NIC 2 for my mgmt network (VLAN 10, tagged on the switch)
- enter relevant IP and FQDN from VLAN 10 in PVE installer
Planned Post Install Steps
- NVMe storage: make a 16G mirror for logs of
rpooland a new mirror poolr1nvmewith the rest - access network: use onboard NIC 1 for my access network (VLAN 50. tagged on the switch)
- storage network: use one 10 GbE NIC port for access to my storage network (Ceph’s
public_network, VLAN 40, tagged on the switch)
Pre-Installation Tasks in Home Network Infrastructure
- ensured DNS forward and reverse entries exist for
- 192.168.50.185 ts-473a-01.internal.pcfe.net
- 192.168.10.185 ts-473a-01.mgmt.pcfe.net
- 192.168.40.185 ts-473a-01.storage.pcfe.net
- set the switch port connected to NIC 1 (enp6s0) to profile access + all except both storage (access native is because I also PXE boot off that NIC in case of needing emergency boot. is will be used to acces the PVE webUI in my 50 network and to access the mgmt network on 10)
- set the switch port connected to NIC 2 (enp5s0) to Primary Network: mgmt (10) and block all other VLANs
- set the switch port connected to the 1st 10 GbE NIC to Primary Network: storage (40) and block all other VLANs
- the second 10 GbE port is not connected for now
- firewall, zone based, on the EdgeRouter 6P
Setting UEFI (aka BIOS) Options
Entering BIOS Setup on QNAP TS-473A
Use the DEL key during power on self test (POST).
My Settings
Core Version: 5.14 (12/20/2021 11:58:14)
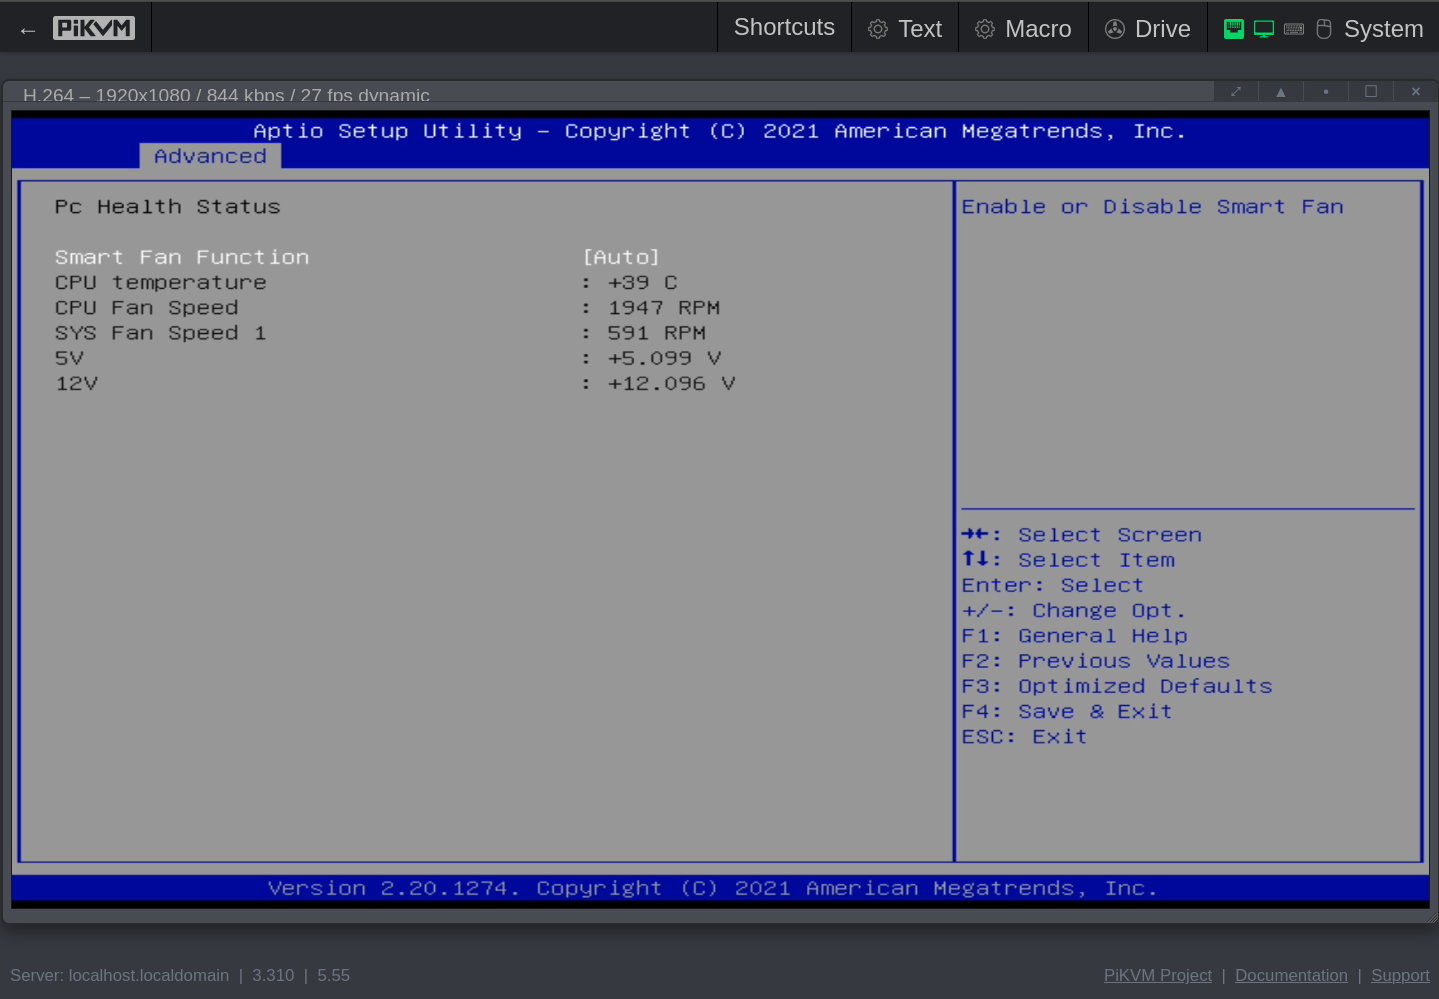
- Advanced
- Hardware Monitor
- Smart Fan Function: Auto
- CPU Configuration
- PSS Support: Enabled
- PPC Adjustment: PState 0 (this should only be the PState at power on time, so 0 is OK for me. I expect the OS to go to P0, P1 or P2 as needed)
- NX Mode: Enabled
- SVM Mode: Enabled
- Hardware Monitor
- Chipset
- Eup Function: Enable
- Restore AC Power Loss: Last State
- BIOS Beep Function: Disable
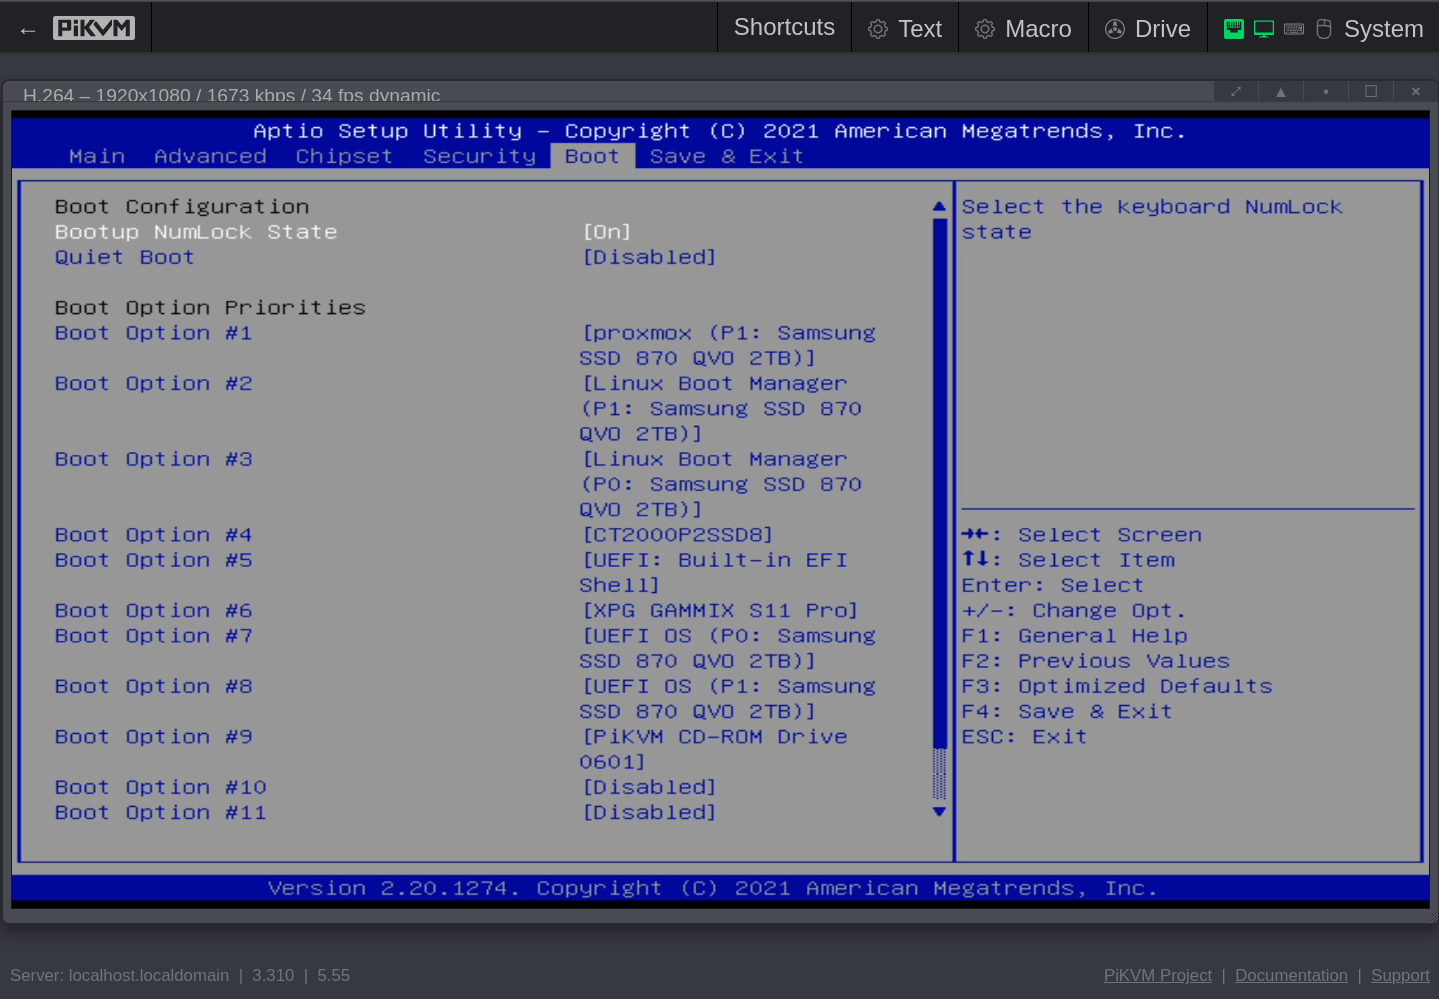
Boot override: UEFI OS (USB stick name)
Click to see the screenshots of my settings for version Q07DAR15 (aka 5.14, aka 12/20/2021 11:58:14).
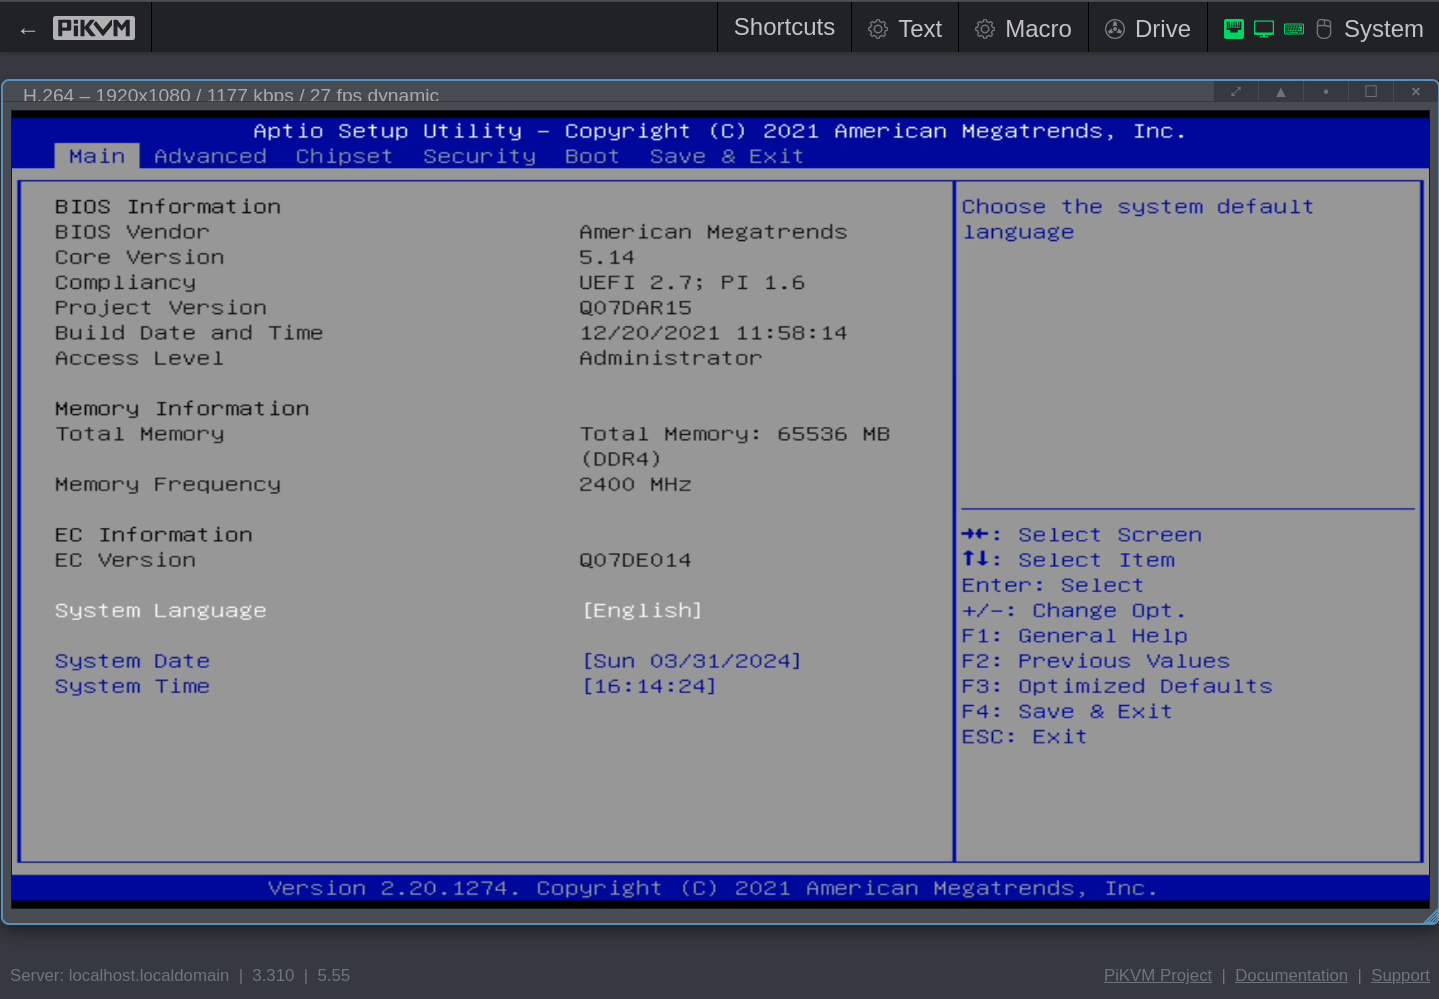


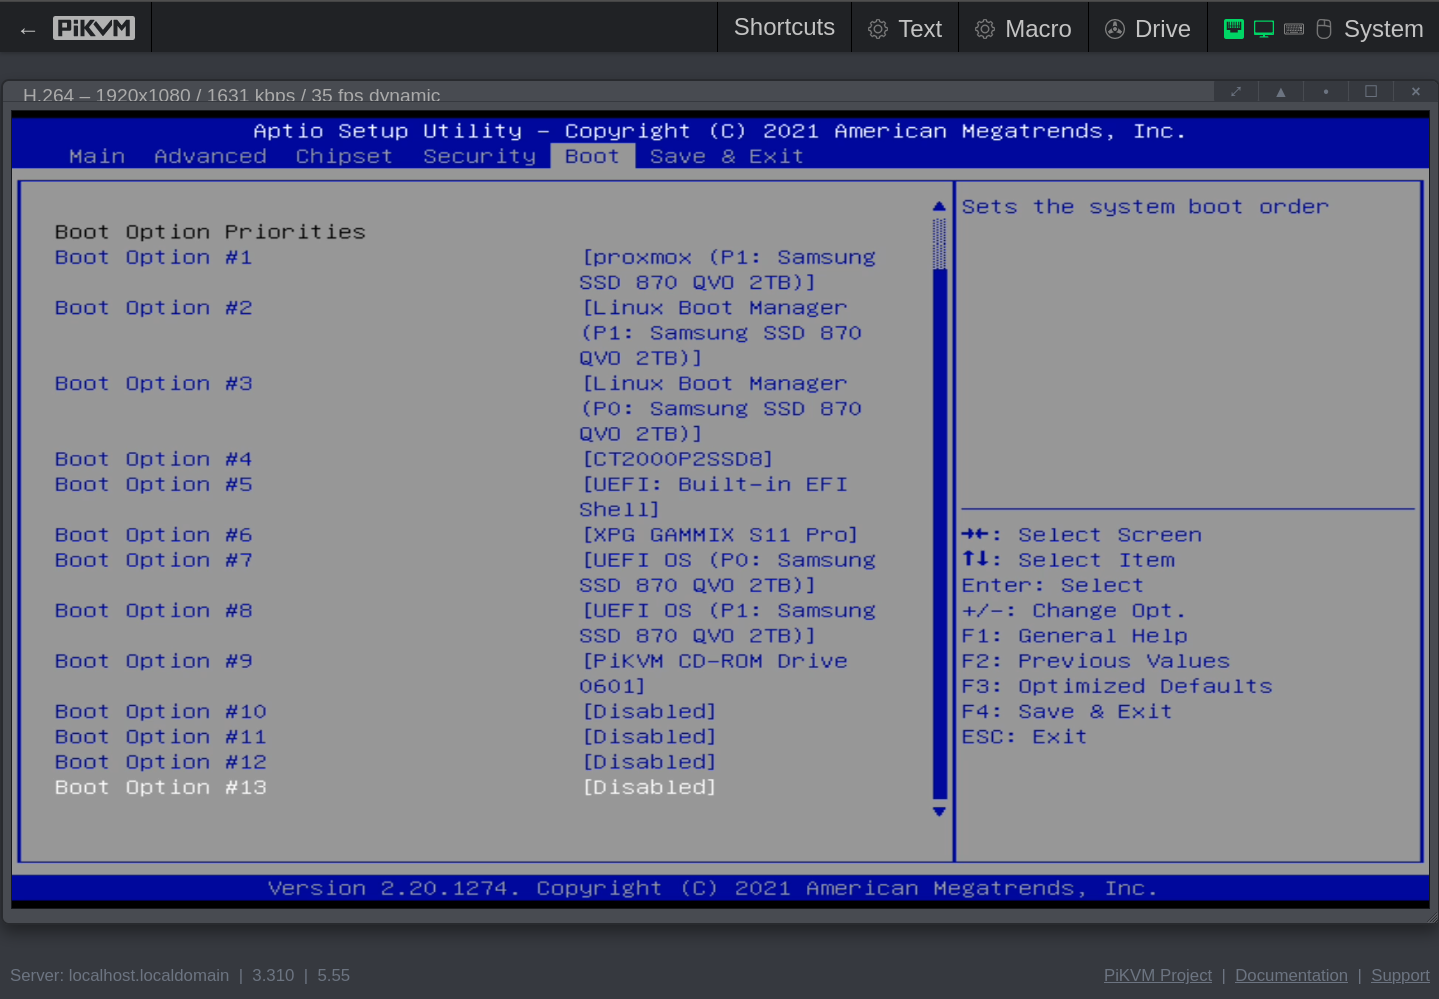
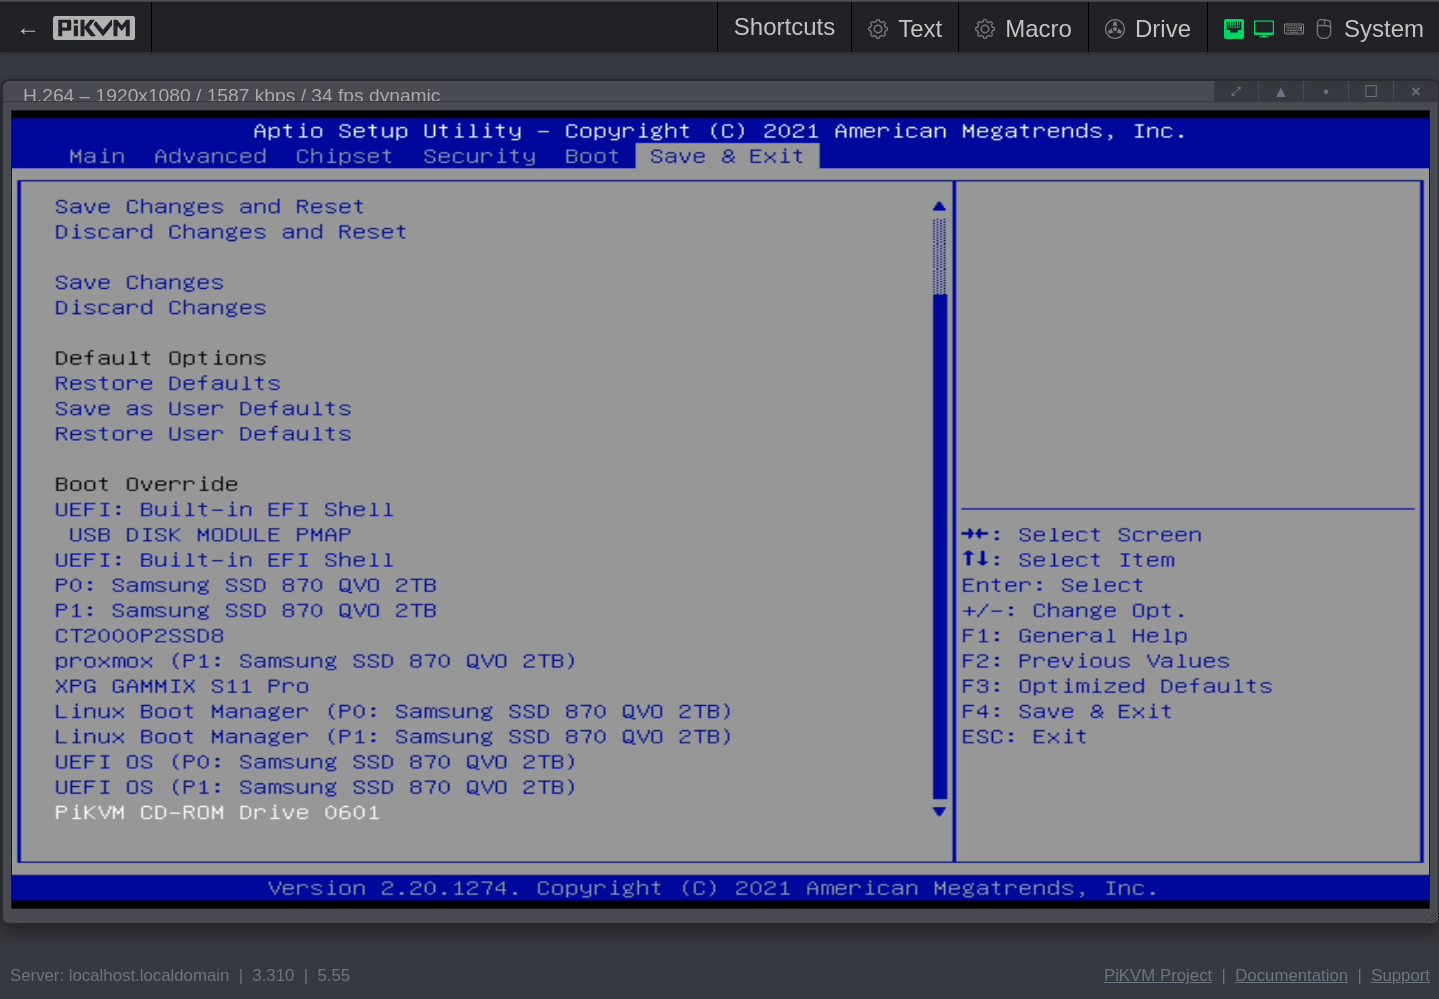
These screenshots were made with the help of my PiKVM V4 Mini, which I temporarily wired with HDMI and USB to the QNAP.
Secure Boot
Not possible out of the box with my QNAP TS-473A. And that’s OK-ish, QNAP produce these for their OS, not for my disstro hopping use case.
While for my PVE 7 install on a Secure Boot capable machine, I had to disable Secure Boot, in Proxmox VE version 8.1 secboot support was added. Nice!
While I happily enabled Secure Boot on my Dell T7910, I found no Secure Boot related settings in the BIOS setup screens of the QNAP TS-473A. :-(
Once PVE is installed, I get
root@ts-473a-01:~# date ; mokutil --sb-state
Fri Mar 29 08:14:12 PM CET 2024
SecureBoot disabled
Platform is in Setup Mode
So the box might be capable, but besides not having any settings exposed in the ‘BIOS Setup’ and currently being in Setup Mode, it also has no keys loaded out of the box.
root@ts-473a-01:~# efi-readvar
Variable PK has no entries
Variable KEK has no entries
Variable db has no entries
Variable dbx has no entries
Variable MokList has no entries
BIOS setup, 2nd check for Secure Boot settings
- With Q07DAR15 (Core Version: 5.14 (12/20/2021 11:58:14)), I seem to already have the latest BIOS.
- Also on second checking in the ‘BIOS Setup’ screens, I found nothing SecureBoot related.
Theoretically I Could Add a PK
On 2024-03-30 I followed section Switching an Existing Installation to Secure Boot at https://pve.proxmox.com/pve-docs/pve-admin-guide.html#sysboot to ensure PVE side is good to go.
While I could possibly load one of my choice from within the PVE’s BaseOS, without key control in the “BIOS Setup” when physically present, this is IMO not the wisest choice for a machine on which I regularly distro hop.
See also:
- https://wiki.debian.org/SecureBoot
- https://pve.proxmox.com/wiki/Secure_Boot_Setup#Enrolling_the_custom_keys.
- https://www.crowdstrike.com/blog/enhancing-secure-boot-chain-on-fedora-29/
- https://learn.microsoft.com/en-us/windows-hardware/manufacture/desktop/windows-secure-boot-key-creation-and-management-guidance?view=windows-11
Selected PVE Installer Options
I made the following choices in the GUI installer:
| Option | Value | Note |
|---|---|---|
| Filesystem | zfs (RAIDZ-1) | on the 4 SATA SSDs |
| Disks chosen | /dev/sda | /dev/sdb | /dev/sdc | /dev/sdd | 4x 2.5" 2TB SATA SSD |
| [REDACTED] | that only works on my intranet but I want notifications locally anyway | |
| Management Interface | enp5s0 | marked as NIC 2 on the chassis |
| Hostname | ts-473a-01 | I entered the FQDN ts-473a-01.mgmt.pcfe.net but the Summary screen only shows the short hostname |
| IP CIDR | 192.168.10.185/24 | the needed VLAN is tagged on the switch |
| Gateway | 192.168.10.1 | my EdgeRouter-6P |
| DNS | 192.168.50.248 | my homelab’s BIND |
Post-Install Configuration
Pretty much the same as on the T7910.
TODO: review the Ansible roles and playbooks I used for Red Hat family distros on this QNAP hardware and ensure they work fine against Debian 12.
Repository Adjustments and Proxmox VE Upgrade
Since for a testrun I did not purchase a subscription;
- I disabled the pve enterprise repo
- I disabled the ceph quincy enterprise repo
- I enabled the pve no-subscription repo
- I enabled the ceph-reef no-subscription repo
This is easily done in the webUI, which allows to select No-Subscription and Ceph Reef No-Subscription. No need to look up the repo coordinates, just click around. If you prefer to edit the files by hand, the repos are well documented on their Wiki page Package Repositories.
AFAICT, adding non-free-firmware from the Debian repos still needs to be done manually.
I enabled that too.
While Ceph RBD storage pools work without further repo changes,
Because I want to use a CephFS storage pool,
I switched from Ceph Quincy to Ceph Reef no-subscription repository as well.
Reef just because my external Ceph cluster is running
ceph version 18.2.0-131.el9cp (d2f32f94f1c60fec91b161c8a1f200fca2bb8858) reef (stable)
so I might as well use Reef client tools on the PVE node.
You might prefer Proxmox’ default (for their built-in Ceph) of Quincy. As long as your used Ceph versions are not EOL it’s generally not fussy when client and cluster are not the same version.
Click to see the repofiles I have in use.
root@ts-473a-01:~# for i in /etc/apt/sources.list /etc/apt/sources.list.d/* ; do echo "### START of my ${i}" ; cat ${i} ;echo "### END of my ${i}" ; echo ; done
### START of my /etc/apt/sources.list
deb http://ftp.de.debian.org/debian bookworm main contrib non-free-firmware

deb http://ftp.de.debian.org/debian bookworm-updates main contrib non-free-firmware

# security updates
deb http://security.debian.org bookworm-security main contrib

deb http://download.proxmox.com/debian/pve bookworm pve-no-subscription

### END of my /etc/apt/sources.list

### START of my /etc/apt/sources.list.d/ceph.list
# deb https://enterprise.proxmox.com/debian/ceph-quincy bookworm enterprise

deb http://download.proxmox.com/debian/ceph-reef bookworm no-subscription

### END of my /etc/apt/sources.list.d/ceph.list

### START of my /etc/apt/sources.list.d/pve-enterprise.list
# deb https://enterprise.proxmox.com/debian/pve bookworm pve-enterprise

### END of my /etc/apt/sources.list.d/pve-enterprise.list

root@ts-473a-01:~#
After this repo adjustment, I applied updates via the command line as instructed. And since I got a new kernel, I rebooted the box cleanly.
Click to see the versions of each component.
root@ts-473a-01:~# pveversion --verbose
proxmox-ve: 8.1.0 (running kernel: 6.5.13-3-pve)
pve-manager: 8.1.10 (running version: 8.1.10/4b06efb5db453f29)
proxmox-kernel-helper: 8.1.0
proxmox-kernel-6.5.13-3-pve-signed: 6.5.13-3
proxmox-kernel-6.5: 6.5.13-3
proxmox-kernel-6.5.11-8-pve-signed: 6.5.11-8
ceph-fuse: 18.2.1-pve2
corosync: 3.1.7-pve3
criu: 3.17.1-2
glusterfs-client: 10.3-5
ifupdown2: 3.2.0-1+pmx8
ksm-control-daemon: 1.4-1
libjs-extjs: 7.0.0-4
libknet1: 1.28-pve1
libproxmox-acme-perl: 1.5.0
libproxmox-backup-qemu0: 1.4.1
libproxmox-rs-perl: 0.3.3
libpve-access-control: 8.1.3
libpve-apiclient-perl: 3.3.2
libpve-cluster-api-perl: 8.0.5
libpve-cluster-perl: 8.0.5
libpve-common-perl: 8.1.1
libpve-guest-common-perl: 5.0.6
libpve-http-server-perl: 5.0.6
libpve-network-perl: 0.9.6
libpve-rs-perl: 0.8.8
libpve-storage-perl: 8.1.4
libspice-server1: 0.15.1-1
lvm2: 2.03.16-2
lxc-pve: 5.0.2-4
lxcfs: 5.0.3-pve4
novnc-pve: 1.4.0-3
proxmox-backup-client: 3.1.5-1
proxmox-backup-file-restore: 3.1.5-1
proxmox-kernel-helper: 8.1.0
proxmox-mail-forward: 0.2.3
proxmox-mini-journalreader: 1.4.0
proxmox-offline-mirror-helper: 0.6.5
proxmox-widget-toolkit: 4.1.5
pve-cluster: 8.0.5
pve-container: 5.0.9
pve-docs: 8.1.5
pve-edk2-firmware: 4.2023.08-4
pve-firewall: 5.0.3
pve-firmware: 3.9-2
pve-ha-manager: 4.0.3
pve-i18n: 3.2.1
pve-qemu-kvm: 8.1.5-4
pve-xtermjs: 5.3.0-3
qemu-server: 8.1.1
smartmontools: 7.3-pve1
spiceterm: 3.3.0
swtpm: 0.8.0+pve1
vncterm: 1.8.0
zfsutils-linux: 2.2.3-pve1
The webUI now shows Proxmox Virtual Environment 8.1.10
Network Setup
Since in my home lab, the management network needs a VLAN tag but I saw no place to enter that in the installer GUI, I just tagged on the switch port.
On-board NIC 1 and the first of my two 10 GbE SFP+ can be set up in the PVE webUI or in an editor. Since the on-bard NICs are numbered on the chassis, and I saw no numbers printed near the two SFP+ ports on the 10 GbE NIC, I adopted the same numbering there.
root@ts-473a-01:~# cat /etc/network/interfaces # click to see output
# network interface settings; autogenerated
# Please do NOT modify this file directly, unless you know what
# you're doing.
#
# If you want to manage parts of the network configuration manually,
# please utilize the 'source' or 'source-directory' directives to do
# so.
# PVE will preserve these directives, but will NOT read its network
# configuration from sourced files, so do not attempt to move any of
# the PVE managed interfaces into external files!

auto lo
iface lo inet loopback

iface enp5s0 inet manual
#on-board NIC 2

iface enp6s0 inet manual
#on-board NIC 1

iface enp2s0f0np0 inet manual
#10 GbE 2

iface enp2s0f1np1 inet manual
#10 GbE 1

auto vmbr0
iface vmbr0 inet static
	address 192.168.10.185/24
	gateway 192.168.10.1
	bridge-ports enp5s0
	bridge-stp off
	bridge-fd 0
#mgmt

auto vmbr1
iface vmbr1 inet static
	address 192.168.50.185/24
	bridge-ports enp6s0
	bridge-stp off
	bridge-fd 0
#access

auto vmbr2
iface vmbr2 inet static
	address 192.168.40.185/24
	bridge-ports enp2s0f1np1
	bridge-stp off
	bridge-fd 0
#storage

source /etc/network/interfaces.d/*
SPICE Console Viewer as Default
Datacenter / Options / Console Viewer set to SPICE (remote-viewer) because I have remote-viewer(1) installed on all my workstations
and all my VMs with a graphical console will use SPICE.
root’s Email to Homelab Mail Server
I edited /etc/aliases to send root’s mail to my homelab internal email address, obviously followed by a newaliases and a successful test mail.
Since the hoelab DNS (queried by Proxmox VE) has MX entries for my homelab domain name, that’s the only needed adjustment when using Postfix.
root@ts-473a-01:~# grep ^root /etc/aliases
root: [REDACTED@REDACTED.REDACTED]
Enable virtio-gl
Just the basic install steps from https://pve.proxmox.com/pve-docs/chapter-qm.html#qm_display
root@ts-473a-01:~# apt install libgl1 libegl1
Reading package lists... Done
Building dependency tree... Done
Reading state information... Done
The following additional packages will be installed:
  libdrm-amdgpu1 libdrm-intel1 libdrm-nouveau2 libdrm-radeon1 libegl-mesa0 libgl1-mesa-dri libglapi-mesa libglvnd0 libglx-mesa0 libglx0
  libllvm15 libpciaccess0 libsensors-config libsensors5 libwayland-client0 libxcb-dri2-0 libxcb-dri3-0 libxcb-glx0 libxcb-present0
  libxcb-randr0 libxcb-sync1 libxcb-xfixes0 libxfixes3 libxshmfence1 libxxf86vm1 libz3-4
Suggested packages:
  lm-sensors
The following NEW packages will be installed:
  libdrm-amdgpu1 libdrm-intel1 libdrm-nouveau2 libdrm-radeon1 libegl-mesa0 libegl1 libgl1 libgl1-mesa-dri libglapi-mesa libglvnd0
  libglx-mesa0 libglx0 libllvm15 libpciaccess0 libsensors-config libsensors5 libwayland-client0 libxcb-dri2-0 libxcb-dri3-0 libxcb-glx0
  libxcb-present0 libxcb-randr0 libxcb-sync1 libxcb-xfixes0 libxfixes3 libxshmfence1 libxxf86vm1 libz3-4
0 upgraded, 28 newly installed, 0 to remove and 0 not upgraded.
Need to get 39.2 MB of archives.
After this operation, 171 MB of additional disk space will be used.
Do you want to continue? [Y/n]
Get:1 http://ftp.de.debian.org/debian bookworm/main amd64 libdrm-amdgpu1 amd64 2.4.114-1+b1 [20.9 kB]
[…]
Setting up libgl1:amd64 (1.6.0-1) ...
Processing triggers for libc-bin (2.36-9+deb12u4) ...
root@ts-473a-01:~#
Trust my Homelab CA
root@ts-473a-01:~# cd /usr/local/share/ca-certificates/
root@ts-473a-01:/usr/local/share/ca-certificates# ls
root@ts-473a-01:/usr/local/share/ca-certificates# curl -O http://fileserver.internal.pcfe.net/pcfe-CA-2017-pem.crt
  % Total    % Received % Xferd  Average Speed   Time    Time     Time  Current
                                 Dload  Upload   Total   Spent    Left  Speed
100  1103  100  1103    0     0   184k      0 --:--:-- --:--:-- --:--:--  215k
root@ts-473a-01:/usr/local/share/ca-certificates# update-ca-certificates
Updating certificates in /etc/ssl/certs...
rehash: warning: skipping ca-certificates.crt,it does not contain exactly one certificate or CRL
1 added, 0 removed; done.
Running hooks in /etc/ca-certificates/update.d...
done.
Enable Monitoring From my Homelab’s CheckMK
Grab the agent from my CheckMK server
root@ts-473a-01:~# curl -O https://check-mk.internal.pcfe.net/HouseNet/check_mk/agents/check-mk-agent_2.1.0p38-1_all.deb
  % Total    % Received % Xferd  Average Speed   Time    Time     Time  Current
                                 Dload  Upload   Total   Spent    Left  Speed
100 3946k  100 3946k    0     0  35.9M      0 --:--:-- --:--:-- --:--:-- 36.0M
Install it
root@ts-473a-01:~# dpkg -i check-mk-agent_2.1.0p38-1_all.deb
Selecting previously unselected package check-mk-agent.
(Reading database ... 55489 files and directories currently installed.)
Preparing to unpack check-mk-agent_2.1.0p38-1_all.deb ...
Unpacking check-mk-agent (2.1.0p38-1) ...
Setting up check-mk-agent (2.1.0p38-1) ...

Deploying agent controller: /usr/bin/cmk-agent-ctl
Deploying systemd units: check-mk-agent.socket check-mk-agent@.service check-mk-agent-async.service cmk-agent-ctl-daemon.service
Deployed systemd
Creating/updating cmk-agent user account ...

WARNING: The agent controller is operating in an insecure mode! To secure the connection run `cmk-agent-ctl register`.

Activating systemd unit 'check-mk-agent.socket'...
Created symlink /etc/systemd/system/sockets.target.wants/check-mk-agent.socket → /lib/systemd/system/check-mk-agent.socket.
Activating systemd unit 'check-mk-agent-async.service'...
Created symlink /etc/systemd/system/multi-user.target.wants/check-mk-agent-async.service → /lib/systemd/system/check-mk-agent-async.service.
Activating systemd unit 'cmk-agent-ctl-daemon.service'...
Created symlink /etc/systemd/system/multi-user.target.wants/cmk-agent-ctl-daemon.service → /lib/systemd/system/cmk-agent-ctl-daemon.service.
Copy the plugins I use from my other PVE node
root@ts-473a-01:~# scp -r t7910:/usr/lib/check_mk_agent/plugins/* /usr/lib/check_mk_agent/plugins/
lmsensors2                                                    100% 3519     2.8MB/s   00:00
smart                                                         100% 7571     6.3MB/s   00:00
lsbrelease                                                    100%  839     1.4MB/s   00:00
entropy_avail                                                 100%  235   433.8KB/s   00:00
root@ts-473a-01:~# scp -r t7910:/etc/check_mk/fileinfo.cfg /etc/check_mk/fileinfo.cfg
fileinfo.cfg
Secure the connection
root@ts-473a-01:~# cmk-agent-ctl register --hostname ts-473a-01 --server check-mk.internal.pcfe.net --site HouseNet --user omdadmin
Disable the On-Board 5GB USB Stick
Like I did for previous distros,
I’ve hidden the small USB storage (that contains QNAP’s OS) so that I can easily restore that if I ever want to sell this box.
The only difference from doing this on Fedora or EL is that (sadly) PVE does not use SELinux, so no restorecon step.
root@ts-473a-01:~# lsblk /dev/sde
NAME   MAJ:MIN RM   SIZE RO TYPE MOUNTPOINTS
sde      8:64   1   4.6G  0 disk
├─sde1   8:65   1   5.1M  0 part
├─sde2   8:66   1 488.4M  0 part
├─sde3   8:67   1 488.4M  0 part
├─sde4   8:68   1     1K  0 part
├─sde5   8:69   1   8.1M  0 part
├─sde6   8:70   1   8.5M  0 part
└─sde7   8:71   1   2.7G  0 part
root@ts-473a-01:~# ls -l /etc/udev/rules.d/
total 1
lrwxrwxrwx 1 root root 9 Mar 29 19:51 60-bridge-network-interface.rules -> /dev/null
root@ts-473a-01:~# cat <<EOF >>/etc/udev/rules.d/75-disable-5GB-on-board-stick.rules
# The on-board 5GB stick should be disabled
# I currently have no use for it and leaving it untouched allows a reset to the shipped state
# by choosing the USB stick as boot target during POST
# c.f. https://projectgus.com/2014/09/blacklisting-a-single-usb-device-from-linux/
SUBSYSTEM=="usb", ATTRS{idVendor}=="1005", ATTRS{idProduct}=="b155", ATTR{authorized}="0"
EOF

chown root:root /etc/udev/rules.d/75-disable-5GB-on-board-stick.rules
chmod 644 /etc/udev/rules.d/75-disable-5GB-on-board-stick.rules
Check That it is Hidden After Reboot
root@ts-473a-01:~# reboot
root@ts-473a-01:~# Connection to ts-473a-01.mgmt.pcfe.net closed by remote host.
Connection to ts-473a-01.mgmt.pcfe.net closed.
[…]
As expected, after rebooting, PVE can no longer see the small USB storage, that should prevent me from overwriting that ~5 GB thing by accident.
root@ts-473a-01:~# uptime
 03:22:27 up 0 min,  1 user,  load average: 0.65, 0.22, 0.08
root@ts-473a-01:~# lsblk
NAME        MAJ:MIN RM  SIZE RO TYPE MOUNTPOINTS
sda           8:0    0  1.8T  0 disk
├─sda1        8:1    0 1007K  0 part
├─sda2        8:2    0    1G  0 part
└─sda3        8:3    0  1.8T  0 part
sdb           8:16   0  1.8T  0 disk
├─sdb1        8:17   0 1007K  0 part
├─sdb2        8:18   0    1G  0 part
└─sdb3        8:19   0  1.8T  0 part
sdc           8:32   1  1.8T  0 disk
├─sdc1        8:33   1 1007K  0 part
├─sdc2        8:34   1    1G  0 part
└─sdc3        8:35   1  1.8T  0 part
sdd           8:48   1  1.8T  0 disk
├─sdd1        8:49   1 1007K  0 part
├─sdd2        8:50   1    1G  0 part
└─sdd3        8:51   1  1.8T  0 part
zd0         230:0    0    1M  0 disk
zd16        230:16   0    4M  0 disk
zd32        230:32   0   32G  0 disk
├─zd32p1    230:33   0  600M  0 part
├─zd32p2    230:34   0    1G  0 part
└─zd32p3    230:35   0 30.4G  0 part
nvme0n1     259:0    0  1.9T  0 disk
[…]
nvme1n1     259:3    0  1.8T  0 disk
[…]
root@ts-473a-01:~#
Disable Kernel Samepage Merging
Since I have plenty RAM and do not want the performance hit of KSM, I disabled as per docs
root@ts-473a-01:~# systemctl disable --now ksmtuned
Removed "/etc/systemd/system/multi-user.target.wants/ksmtuned.service".
root@ts-473a-01:~# echo 2 > /sys/kernel/mm/ksm/run
Configure and Activate Watchdog
Knowing that I have a sp5100 on this machine, I configured that model as per Proxmox docs
root@ts-473a-01:~# cat /etc/default/pve-ha-manager
# select watchdog module (default is softdog)
#WATCHDOG_MODULE=ipmi_watchdog
WATCHDOG_MODULE=sp5100_tco
This change did need a reboot to activate, just bouncing watchdog-mux.service still left me on softdog.
That’s OK for a watchdog config.
root@ts-473a-01:~# reboot
root@ts-473a-01:~# Connection to ts-473a-01.mgmt.pcfe.net closed by remote host.
Connection to ts-473a-01.mgmt.pcfe.net closed.
pcfe@t3600 ~ $ ssh ts-473a-01.mgmt.pcfe.net -l root
[…]
root@ts-473a-01:~# lsmod | grep 5100
sp5100_tco             20480  1
root@ts-473a-01:~# journalctl -b --grep sp5100
Mar 30 04:01:06 ts-473a-01 watchdog-mux[1230]: Loading watchdog module 'sp5100_tco'
Mar 30 04:01:06 ts-473a-01 kernel: sp5100_tco: SP5100/SB800 TCO WatchDog Timer Driver
Mar 30 04:01:06 ts-473a-01 kernel: sp5100-tco sp5100-tco: Using 0xfeb00000 for watchdog MMIO address
Mar 30 04:01:06 ts-473a-01 kernel: sp5100-tco sp5100-tco: initialized. heartbeat=60 sec (nowayout=0)
Mar 30 04:01:06 ts-473a-01 watchdog-mux[1230]: Watchdog driver 'SP5100 TCO timer', version 0
root@ts-473a-01:~# journalctl -b -u watchdog-mux.service
Mar 30 03:57:47 ts-473a-01 systemd[1]: Started watchdog-mux.service - Proxmox VE watchdog multiplexer.
Mar 30 03:57:47 ts-473a-01 watchdog-mux[1234]: Loading watchdog module 'sp5100_tco'
Mar 30 03:57:47 ts-473a-01 watchdog-mux[1234]: Watchdog driver 'SP5100 TCO timer', version 0
Test Watchdog
root@ts-473a-01:~# echo '1' > /proc/sys/kernel/sysrq
root@ts-473a-01:~# date ; echo 'c' > /proc/sysrq-trigger
As expected, the host reboots about 30 seconds later.
Take 2 NVMe into use
Partition Both NVMe
I wanted to have mirrored setup with a small slice to speed up the SATA SSD storage and the rest for fast VM storage. For this I recycled 2 ~2TB NVMes I had previously used in my homelab. No need for any fancy NVMes, since the mobo only attaches each NVMe with 1 (one) PCIe Gen3 lane instead of the usual 4 lanes :-/
root@ts-473a-01:~# parted /dev/nvme0n1 mklabel gpt mkpart primary zfs 1 16GiB mkpart primary zfs 16Gi[52/209]
Information: You may need to update /etc/fstab.

root@ts-473a-01:~# parted /dev/nvme1n1 mklabel gpt mkpart primary zfs 1 16GiB mkpart primary zfs 16GiB 100%
Information: You may need to update /etc/fstab.

root@ts-473a-01:~# lsblk
NAME        MAJ:MIN RM   SIZE RO TYPE MOUNTPOINTS
sda           8:0    0   1.8T  0 disk
├─sda1        8:1    0  1007K  0 part
├─sda2        8:2    0     1G  0 part
└─sda3        8:3    0   1.8T  0 part
sdb           8:16   0   1.8T  0 disk
├─sdb1        8:17   0  1007K  0 part
├─sdb2        8:18   0     1G  0 part
└─sdb3        8:19   0   1.8T  0 part
sdc           8:32   1   1.8T  0 disk
├─sdc1        8:33   1  1007K  0 part
├─sdc2        8:34   1     1G  0 part
└─sdc3        8:35   1   1.8T  0 part
sdd           8:48   1   1.8T  0 disk
├─sdd1        8:49   1  1007K  0 part
├─sdd2        8:50   1     1G  0 part
└─sdd3        8:51   1   1.8T  0 part
nvme0n1     259:0    0   1.9T  0 disk
├─nvme0n1p1 259:3    0    16G  0 part
└─nvme0n1p2 259:4    0   1.8T  0 part
nvme1n1     259:6    0   1.8T  0 disk
├─nvme1n1p1 259:5    0    16G  0 part
└─nvme1n1p2 259:7    0   1.8T  0 part
root@ts-473a-01:~#
Add Log on NVMe to the ZFS Pool Backed by SATA SSDs
Similar to what I did for my T7910,
but this time I addressed the 2 NVMe via their physical slot in the machine instead of /by-id/.
root@ts-473a-01:~# ls -l /dev/disk/by-path/*nvme*
lrwxrwxrwx 1 root root 13 Mar 29 21:54 /dev/disk/by-path/pci-0000:03:00.0-nvme-1 -> ../../nvme0n1
lrwxrwxrwx 1 root root 15 Mar 29 21:54 /dev/disk/by-path/pci-0000:03:00.0-nvme-1-part1 -> ../../nvme0n1p1
lrwxrwxrwx 1 root root 15 Mar 29 21:54 /dev/disk/by-path/pci-0000:03:00.0-nvme-1-part2 -> ../../nvme0n1p2
lrwxrwxrwx 1 root root 13 Mar 29 21:54 /dev/disk/by-path/pci-0000:04:00.0-nvme-1 -> ../../nvme1n1
lrwxrwxrwx 1 root root 15 Mar 29 21:54 /dev/disk/by-path/pci-0000:04:00.0-nvme-1-part1 -> ../../nvme1n1p1
lrwxrwxrwx 1 root root 15 Mar 29 21:54 /dev/disk/by-path/pci-0000:04:00.0-nvme-1-part2 -> ../../nvme1n1p2
root@ts-473a-01:~# zpool status
  pool: rpool
 state: ONLINE
config:

        NAME                                                   STATE     READ WRITE CKSUM
        rpool                                                  ONLINE       0     0     0
          raidz1-0                                             ONLINE       0     0     0
            ata-Samsung_SSD_870_QVO_2TB_[  REDACTED   ]-part3  ONLINE       0     0     0
            ata-Samsung_SSD_870_EVO_2TB_[  REDACTED   ]-part3  ONLINE       0     0     0
            ata-Samsung_SSD_870_QVO_2TB_[  REDACTED   ]-part3  ONLINE       0     0     0
            ata-Samsung_SSD_870_QVO_2TB_[  REDACTED   ]-part3  ONLINE       0     0     0

errors: No known data errors
root@ts-473a-01:~# zpool add rpool log mirror /dev/disk/by-path/pci-0000:03:00.0-nvme-1-part1 /dev/disk/by-path/pci-0000:04:00.0-nvme-1-part1
invalid vdev specification
use '-f' to override the following errors:
/dev/disk/by-path/pci-0000:04:00.0-nvme-1-part1 contains a filesystem of type 'vfat'
Oh, still some old crap on there, no matter, wiping.
root@ts-473a-01:~# wipefs -af /dev/disk/by-path/pci-0000:04:00.0-nvme-1-part1
/dev/disk/by-path/pci-0000:04:00.0-nvme-1-part1: 8 bytes were erased at offset 0x00000052 (vfat): 46 41 54 33 32 20 20 20
/dev/disk/by-path/pci-0000:04:00.0-nvme-1-part1: 1 byte was erased at offset 0x00000000 (vfat): eb
/dev/disk/by-path/pci-0000:04:00.0-nvme-1-part1: 2 bytes were erased at offset 0x000001fe (vfat): 55 aa
Now I could add the fast log to my existing SATA SSD backed pool.
root@ts-473a-01:~# zpool add rpool log mirror /dev/disk/by-path/pci-0000:03:00.0-nvme-1-part1 /dev/disk/by-path/pci-0000:04:00.0-nvme-1-part1
root@ts-473a-01:~# zpool status
  pool: rpool
 state: ONLINE
config:

	NAME                                                   STATE     READ WRITE CKSUM
	rpool                                                  ONLINE       0     0     0
	  raidz1-0                                             ONLINE       0     0     0
	    ata-Samsung_SSD_870_QVO_2TB_[  REDACTED   ]-part3  ONLINE       0     0     0
	    ata-Samsung_SSD_870_EVO_2TB_[  REDACTED   ]-part3  ONLINE       0     0     0
	    ata-Samsung_SSD_870_QVO_2TB_[  REDACTED   ]-part3  ONLINE       0     0     0
	    ata-Samsung_SSD_870_QVO_2TB_[  REDACTED   ]-part3  ONLINE       0     0     0
	logs
	  mirror-1                                             ONLINE       0     0     0
	    pci-0000:03:00.0-nvme-1-part1                      ONLINE       0     0     0
	    pci-0000:04:00.0-nvme-1-part1                      ONLINE       0     0     0

errors: No known data errors
Create a Mirrored Pool for VM Disks Backed by NVMe
Having only used 16 GiB of about 2 TB, I wanted to use the rest for VMs that need truly fast storage.
Using twice 100% in my previous parted commands, when run at not identical size SSDs, was dumb. So I quickly resized partition 2 on each NVMe (click for details).
root@ts-473a-01:~# lsblk /dev/nvme0n1 /dev/nvme1n1
NAME        MAJ:MIN RM  SIZE RO TYPE MOUNTPOINTS
nvme0n1     259:0    0  1.9T  0 disk
├─nvme0n1p1 259:1    0   16G  0 part
└─nvme0n1p2 259:2    0  1.8T  0 part
nvme1n1     259:3    0  1.8T  0 disk
├─nvme1n1p1 259:4    0   16G  0 part
└─nvme1n1p2 259:5    0  1.8T  0 part
root@ts-473a-01:~# ls -l /dev/disk/by-path/*nvme*
lrwxrwxrwx 1 root root 13 Mar 29 22:04 /dev/disk/by-path/pci-0000:03:00.0-nvme-1 -> ../../nvme0n1
lrwxrwxrwx 1 root root 15 Mar 29 22:11 /dev/disk/by-path/pci-0000:03:00.0-nvme-1-part1 -> ../../nvme0n1p1
lrwxrwxrwx 1 root root 15 Mar 29 22:04 /dev/disk/by-path/pci-0000:03:00.0-nvme-1-part2 -> ../../nvme0n1p2
lrwxrwxrwx 1 root root 13 Mar 29 22:04 /dev/disk/by-path/pci-0000:04:00.0-nvme-1 -> ../../nvme1n1
lrwxrwxrwx 1 root root 15 Mar 29 22:11 /dev/disk/by-path/pci-0000:04:00.0-nvme-1-part1 -> ../../nvme1n1p1
lrwxrwxrwx 1 root root 15 Mar 29 22:04 /dev/disk/by-path/pci-0000:04:00.0-nvme-1-part2 -> ../../nvme1n1p2
root@ts-473a-01:~# zpool create -o ashift=12 r1nvme mirror /dev/disk/by-path/pci-0000:03:00.0-nvme-1-part2 /dev/disk/by-path/pci-0000:04:00.0-nvme-1-part2
invalid vdev specification
use '-f' to override the following errors:
mirror contains devices of different sizes
root@ts-473a-01:~# parted /dev/nvme0n1 p
Model: XPG GAMMIX S11 Pro (nvme)
Disk /dev/nvme0n1: 2048GB
Sector size (logical/physical): 512B/512B
Partition Table: gpt
Disk Flags:

Number  Start   End     Size    File system  Name     Flags
 1      1049kB  17.2GB  17.2GB  zfs          primary
 2      17.2GB  2048GB  2031GB               primary

root@ts-473a-01:~# parted /dev/nvme1n1 p
Model: CT2000P2SSD8 (nvme)
Disk /dev/nvme1n1: 2000GB
Sector size (logical/physical): 512B/512B
Partition Table: gpt
Disk Flags:

Number  Start   End     Size    File system  Name     Flags
 1      1049kB  17.2GB  17.2GB  zfs          primary
 2      17.2GB  2000GB  1983GB               primary

root@ts-473a-01:~#
Because it’s not i use yet, I can resize safely.
root@ts-473a-01:~# parted /dev/nvme0n1 resizepart 2 1999GB
Warning: Shrinking a partition can cause data loss, are you sure you want to continue?
Yes/No? yes
Information: You may need to update /etc/fstab.

root@ts-473a-01:~# parted /dev/nvme1n1 resizepart 2 1999GB
Warning: Shrinking a partition can cause data loss, are you sure you want to continue?
Yes/No? yes
Information: You may need to update /etc/fstab.
Once the partition sizes were equal;
root@ts-473a-01:~# parted /dev/nvme0n1 p
Model: XPG GAMMIX S11 Pro (nvme)
Disk /dev/nvme0n1: 2048GB
Sector size (logical/physical): 512B/512B
Partition Table: gpt
Disk Flags:

Number  Start   End     Size    File system  Name     Flags
 1      1049kB  17.2GB  17.2GB  zfs          primary
 2      17.2GB  1999GB  1982GB               primary

root@ts-473a-01:~# parted /dev/nvme1n1 p
Model: CT2000P2SSD8 (nvme)
Disk /dev/nvme1n1: 2000GB
Sector size (logical/physical): 512B/512B
Partition Table: gpt
Disk Flags:

Number  Start   End     Size    File system  Name     Flags
 1      1049kB  17.2GB  17.2GB  zfs          primary
 2      17.2GB  1999GB  1982GB               primary
I created the mirror using the 1928 GiB partition of each NVMe.
root@ts-473a-01:~# zpool create -o ashift=12 r1nvme mirror /dev/disk/by-path/pci-0000:03:00.0-nvme-1-part2 /dev/disk/by-path/pci-0000:04:00.0-nvme-1-part2
root@ts-473a-01:~# zpool status
  pool: r1nvme
 state: ONLINE
config:

	NAME                               STATE     READ WRITE CKSUM
	r1nvme                             ONLINE       0     0     0
	  mirror-0                         ONLINE       0     0     0
	    pci-0000:03:00.0-nvme-1-part2  ONLINE       0     0     0
	    pci-0000:04:00.0-nvme-1-part2  ONLINE       0     0     0

errors: No known data errors

  pool: rpool
[…]
Adjust /etc/pve/storage.cfg
I added the newly created pool on NVMe and I also,
because I did not yet have anything stored by PVE in rpool/data,
adjusted the name PVE uses for that pool.
Now I have;
root@ts-473a-01:~# cat /etc/pve/storage.cfg
dir: local
	path /var/lib/vz
	content iso,vztmpl,backup

zfspool: local-zfs-nvme
	pool r1nvme
	content images,rootdir
	mountpoint /r1nvme

zfspool: local-zfs-sata
	pool rpool/data
	sparse
	content images,rootdir
	mountpoint /rpool/data
TBD: decide on sparse setting
Before running more than just test VMs on this PVE, I should decide on what sparse setting I want.
Either sparse on both pools on both nodes or lave as is (only sparse on the QNAP and only on the SATA backed pool)?
External Ceph RBD Access
No pools need creating, I accessed the same one as I do on my other PVE node. This also means, until I cluster my PVE nodes, I need to be super extra careful to not use VM IDs that are in use on the other PVE node.
To help me not mess up, in the webUI, at Datacenter / Option / Next Free VMID Range, I set 1000 to 2000. (The other PVE uses 100 - 999)
Grab Keyring for RBD access
The keyring for RBD access was simply copied from my other PVE node.
root@ts-473a-01:~# scp t7910:/etc/pve/priv/ceph/ceph-rbd-external.keyring .
ceph-rbd-external.keyring                                     100%  138   146.0KB/s   00:00
Proxmox Setup for RBD
root@ts-473a-01:~# pvesm add rbd ceph-rbd-external \
--krbd 1 \
--pool proxmox_rbd \
--monhost "192.168.40.181 192.168.40.182 192.168.40.181" \
--content images \
--username proxmox_rbd \
--keyring /root/ceph-rbd-external.keyring
In /etc/pve/storage.cfg, that command generated the expected section
(decide for yourself if, like me, you want to use the optional krbd or not);
rbd: ceph-rbd-external
	content images
	krbd 1
	monhost 192.168.40.181 192.168.40.182 192.168.40.181
	pool proxmox_rbd
	username proxmox_rbd
RBD as PVE Storage Now Active
root@ts-473a-01:~# pvesm status --storage ceph-rbd-external
Name                     Type     Status           Total            Used       Available        %
ceph-rbd-external         rbd     active      3440067454       458076286      2981991168   13.32%
If you are new to Ceph, do note that on Ceph I used … auth get-or-create client.proxmox_rbd …
and you see the string client.proxmox_rbd in the keyring file,
but the username you feed the Proxmox config is only proxmox_rbd.
External Ceph Filesystem Access
Grab Secret for CephFS access
The secret for CephFS access was also copied from my other PVE node.
root@ts-473a-01:~# scp t7910:/etc/pve/priv/ceph/cephfs-external.secret .
cephfs-external.secret                                        100%   41    38.0KB/s   00:00
Proxmox Setup for CephFS
root@ts-473a-01:~# pvesm add cephfs cephfs-external \
--path /mnt/pve/cephfs-external \
--monhost "192.168.40.181 192.168.40.182 192.168.40.181" \
--content vztmpl,backup,snippets,iso \
--subdir /Proxmox_VE \
--username proxmox_fs \
--keyring cephfs-external.secret
As expected, in /etc/pve/storage.cfg, I got the following section
cephfs: cephfs-external
	path /mnt/pve/cephfs-external
	content snippets,backup,iso,vztmpl
	monhost 192.168.40.181 192.168.40.182 192.168.40.181
	subdir /Proxmox_VE
	username proxmox_fs
CephFS as PVE Storage Now Active
root@ts-473a-01:~# pvesm status --storage cephfs-external
Name                   Type     Status           Total            Used       Available        %
cephfs-external      cephfs     active      4222095360      1240166400      2981928960   29.37%
Same comment as for RBD setup; if you are new to Ceph, do note that on Ceph I used … auth get-or-create client.proxmox_fs …
and you see the string client.proxmox_fs in the keyring file,
but the username you feed the Proxmox config is only proxmox_fs.
Also note that for CephFS you feed PVE a secret, while for RBD you feed it a keyring.
Functional Check of CephFS
I can see the contemt my pther PVE node put in CephFS just fine
root@ts-473a-01:~# tree -d /mnt/pve/cephfs-external
/mnt/pve/cephfs-external
├── dump
├── snippets
└── template
    ├── cache
    └── iso

6 directories
root@ts-473a-01:~# tree -h /mnt/pve/cephfs-external/template/iso/
[  25]  /mnt/pve/cephfs-external/template/iso/
├── [899M]  AlmaLinux-9.3-x86_64-boot.iso
├── [ 10G]  AlmaLinux-9.3-x86_64-dvd.iso
├── [1.7G]  AlmaLinux-9.3-x86_64-minimal.iso
├── [4.4G]  CentOS-7-x86_64-DVD-2009.iso
├── [4.4G]  CentOS-7-x86_64-DVD-2207-02.iso
├── [9.2G]  CentOS-Stream-8-x86_64-20210204-dvd1.iso
├── [7.8G]  CentOS-Stream-9-20211201.1-x86_64-dvd1.iso
[…]
├── [628M]  debian-12.4.0-amd64-netinst.iso
├── [300M]  fdi-220523_175410.iso
├── [525M]  fdi-4.1.0-24d62de.iso
├── [300M]  fdi-internal-HouseNet.iso
├── [299M]  fdi-lab-network-221124_212136.iso
├── [2.3G]  Fedora-KDE-Live-x86_64-39-1.5.iso
├── [2.4G]  Fedora-Server-dvd-x86_64-39-1.5.iso
├── [299M]  foreman-discovery-image-3.8.2-1.iso
├── [ 11G]  rhel-8.7-x86_64-dvd.iso
├── [ 13G]  rhel-8.9-x86_64-dvd.iso
├── [901M]  rhel-9.3-x86_64-boot.iso
├── [9.8G]  rhel-9.3-x86_64-dvd.iso
├── [8.4G]  rhel-baseos-9.1-x86_64-dvd.iso
├── [1.3G]  TRuDI_1.6.3_live.iso
├── [2.3G]  ubuntu-18.04.6-desktop-amd64.iso
├── [698M]  virtio-win-0.1.248.iso
└── [5.7G]  Win10_22H2_EnglishInternational_x64v1.iso

1 directory, 25 files
Undo Ceph RBD and CephFS Access
For now I am too worried I’ll mess up my other PVE’s VMs, especially my VM backups.
So I undefined both storages again on the QNAP PVE install.
root@ts-473a-01:~# pvesm remove ceph-rbd-external
root@ts-473a-01:~# pvesm remove cephfs-external
root@ts-473a-01:~# date ; pvesm status
Sat Mar 30 12:33:07 AM CET 2024
Name                  Type     Status           Total            Used       Available        %
local                  dir     active      5532086400             256      5532086144    0.00%
local-zfs-nvme     zfspool     active      1869611008             360      1869610648    0.00%
local-zfs-sata     zfspool     active      5532086370             139      5532086231    0.00%
root@ts-473a-01:~#
I will re-enable full RBD and CephFS storages once both PVE install are aware of the other PVE.
Only Access ISOs on CephFS for now
Since it’s nice to have access to my ISO images for test installs, I re-added only the ISO storage on CephFS,
root@ts-473a-01:~# pvesm add cephfs cephfs-external --path /mnt/pve/cephfs-external --monhost "192.168.40.181 192.168.40.182 192.168.40.181" --content iso --subdir /Proxmox_VE --username proxmox_fs --keyring cephfs-external.secret
root@ts-473a-01:~# pvesm status --storage cephfs-external
Name                   Type     Status           Total            Used       Available        %
cephfs-external      cephfs     active      4221902848      1240166400      2981736448   29.37%
TODO
Look closer at the Mellanox NIC
My QNAP branded Mellanox Technologies MT27710 Family [ConnectX-4 Lx]
10 GbE NIC seems to have some limitations WRT VLAN handling;
- https://forum.proxmox.com/threads/no-vlan-connection-after-reboot.138548/
- https://forum.proxmox.com/threads/proxmox-7-and-mellanox-connectx4-and-vlan-aware-bridge.104926/
TODO: Wire up a DAC to 10 GbE NIC 2 and allow VMs on Proxmox VE to use any of the NICs. But that’s for another day.